Google Home(Nest)をただのスマートスピーカーとして使っているだけではもったいない。
本記事では、Google Cloud Text-to-Speech(TTS)と pychromecast を組み合わせて Google Home を「自家製 TTS 放送局」に仕立てる方法を紹介します。30 種類以上の声から好みの話者を選べるほか、優先度付きキューによる割り込み制御、SSML による細かい発話表現、複数台の Google Home の個別管理まで実現しています。
以前の記事で紹介した google-home-notifier(Node.js)ベースの実装から全面的に進化させた、本格的なスマートホーム向け音声通知基盤の構築方法です。
なぜこの機能を作ったのか?
以前は google-home-notifier(Node.js)を Python から subprocess で呼び出す方式で Google Home に発話させていました。しかし運用を続けるうちに次の課題が積み重なってきました。
- 声が一種類しか選べない(Google の無料 TTS はクオリティが低く、機械的な印象になる)
- 複数の通知が同時に来ると上書きされたり、順序が保証されない
- 「緊急通知(地震など)」と「定時アナウンス」が同じ優先度で扱われてしまう
- Google Home が無通信状態が続くと「ドゥルン」という起動音を出してしまい家族が驚く
- Node.js のメンテナンスが煩雑で Python 一本に統一したかった
これらをすべて解決するために、Google Cloud TTS と pychromecast を使って Python だけで完結する音声通知システムを一から設計しました。
声の種類・発話順序・緊急度まで細かく制御できる、本物の「家庭内放送システム」を作りたい!
実現したいこと
- Google Cloud TTS の 30 種類以上の日本語音声(Standard / Wavenet / Neural2 / Chirp3-HD)を使い分ける
- 優先度付きキューで発話を管理する
- 優先度の高いジョブ(地震警報など)は再生中の音声を中断して割り込む
- 通常の通知は順番待ちでキューに積まれ順序通りに再生される
- SSML(Speech Synthesis Markup Language)でポーズや強調など細かな発話表現を制御する
- 話速・ピッチ・音量補正をプログラムから動的に指定できる
- リビング・子供部屋・Nest Hub など複数の Google Home を個別に制御する
- Google Home の「ドゥルン」起動音を抑制するためのキープアライブ機能を持つ
- 他の Python プログラムからライブラリとして 1 行で呼び出せる
この記事でわかること
- Google Cloud Text-to-Speech API でテキストを MP3 音声に変換する方法
- pychromecast で Google Home / Nest に任意の音声 URL を再生させる方法
- Python の PriorityQueue と threading を使った優先度付き再生キューの実装方法
- SSML を使った自然な発話表現(ポーズ・強調・読み方指定)の方法
- Google Home の「ドゥルン」起動音を防ぐキープアライブの仕組み
- Flask で内部 API サーバーを構築して各プログラムから統一的に呼び出す設計
必要な準備と用意するもの
- Linux 搭載サーバー(Raspberry Pi / NucBoxなどのミニPC 等)
- Google Home / Nest(Mini、Hub など)— 1 台以上(複数台可)
- Nginx など HTTP サーバー — 生成した MP3 ファイルを Google Home に配信するために使用
- Python 3.x
- google-cloud-texttospeech
- pychromecast
- flask
- mutagen(MP3 の再生時間取得用)
- requests
- Google Cloud Text-to-Speech API(Google Cloud Console でサービスアカウントを作成・有効化)
- Nginx(生成した TTS 音声ファイルをローカル HTTP 配信するために使用)
完成イメージ
家の中の複数の Google Home が状況に応じて自動的に発話します。例えば次のような場面で活躍しています。
- 朝 6 時 30 分になると子供部屋の Google Home が「おはようございます、今日は○月○日です」と話しかける
- 電車の遅延情報を検知したらリビングの Google Home が「〇〇線は遅延しています」とアナウンスする
- 地震速報が入ったら最優先で割り込み、定時アナウンス中でも即座に緊急通知を読み上げる
- ドラマの好きな出演者が出ている番組が始まる時間に Nest Hub が知らせてくれる
プログラムから呼び出す際は次の 3 行だけです。声の種類・話速・ピッチ・音量などのパラメータは省略するとデフォルト値が使われます。
import googlehome

notify = googlehome.Notify(googlehome.GoogleHome.LIVING)
notify.speak('おはようございます。今日もよい一日を!')
システムの仕組み
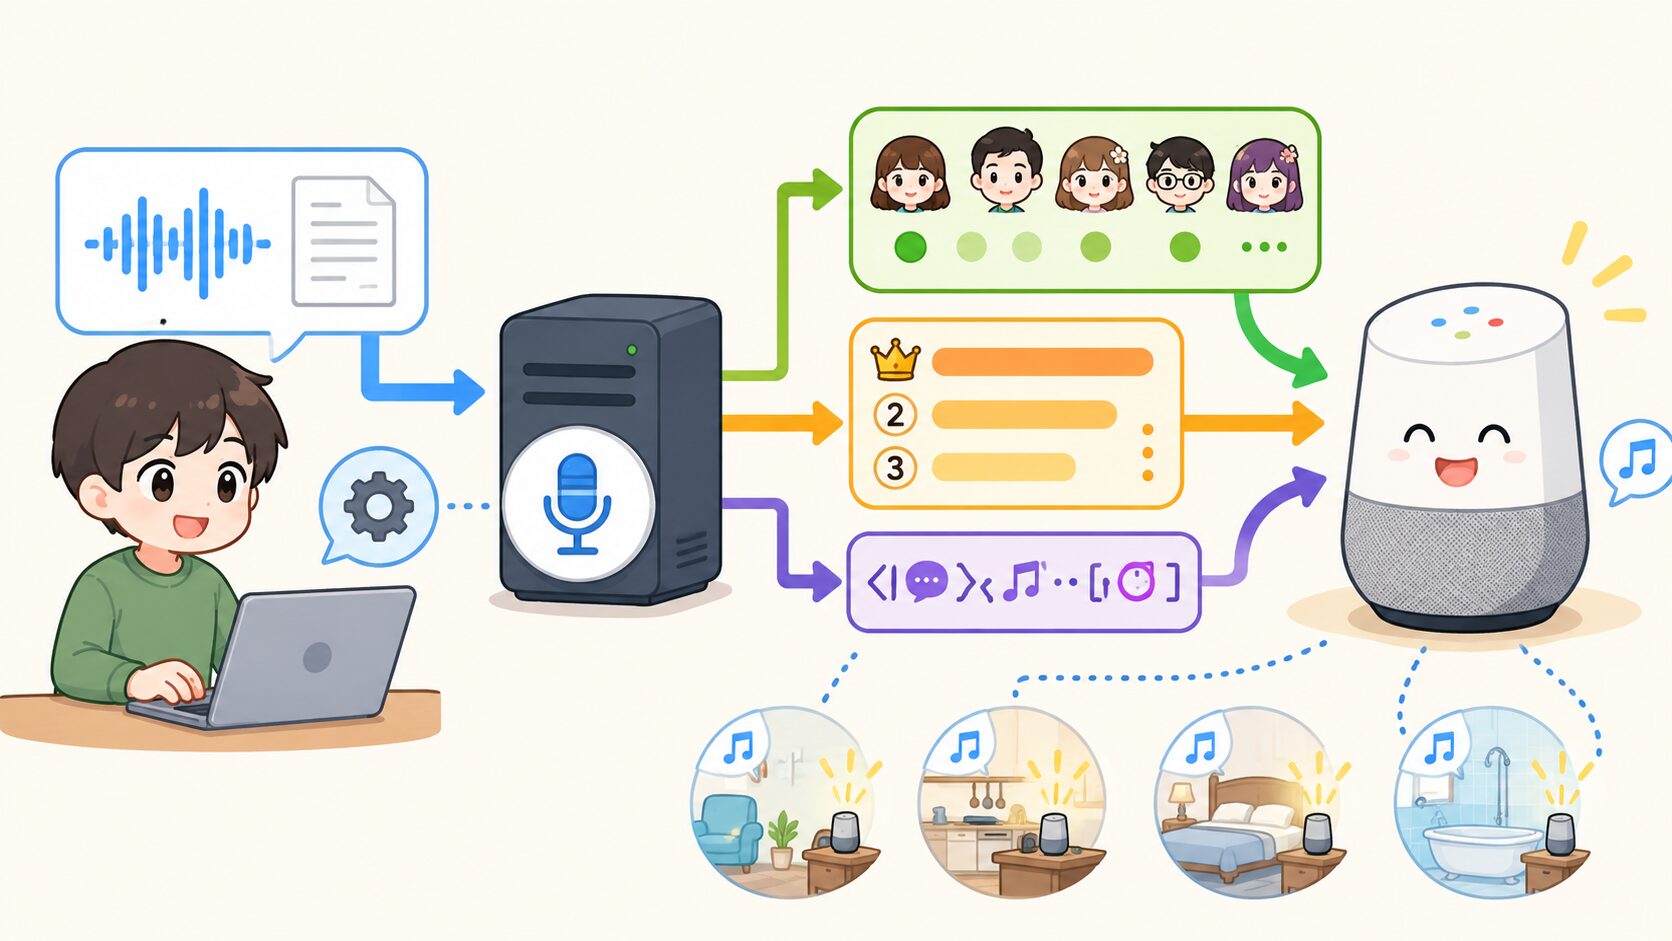
本システムは大きく 3 つのコンポーネントで構成されています。
- クライアントライブラリ(googlehome.py):他のPythonプログラムから呼び出されるインターフェース。speak() / play_audio() などのメソッドを提供する
- 内部 API サーバー(Flask):常駐する HTTP サーバー。クライアントライブラリからのリクエストを受け取り、Google Cloud TTS で MP3 を生成し、pychromecast 経由で Google Home に再生させる。優先度付きキューと再生ワーカーを管理する
- キープアライブ(googlehome_keepalive.py):Google Home が無通信状態で「ドゥルン」という起動音を鳴らさないよう、定期的にダミー音声を再生するプログラム
各 Python プログラム(railway_delay_alert.py / time_rule_notice.py など)
    ↓ notify.speak("メッセージ") を呼ぶ
クライアントライブラリ(googlehome.py)
    ↓ HTTP POST /internal/googlehome/say
内部 API サーバー(Flask + pychromecast)
    ├─ Google Cloud TTS でテキスト → MP3 を生成
    ├─ Nginx 配信フォルダに保存(URL: http://<host>/temp_voice/tts_xxxx.mp3)
    ├─ 優先度付きキューにジョブを積む
    └─ ワーカースレッドが MP3 URL を pychromecast 経由で Google Home に再生させる
Google Home は直接ファイルを受け取ることができません。pychromecast が Google Home に「この URL の MP3 を再生してください」と指示する仕組みのため、生成した MP3 ファイルはホストマシンの Nginx からHTTPでアクセスできる場所に置く必要があります。Google Home とホストマシンは同じ LAN に接続されている必要があります。
実装のポイント
前バージョン(google-home-notifier)との比較
以前の実装は Node.js の google-home-notifier を Python から subprocess で呼び出す方式でした。今回の実装との違いを整理します。
旧構成:google-home-notifier(Node.js)
声の種類が限られ音質も低め。Node.js のメンテナンスが必要。subprocess 呼び出しのため複数リクエストの順序制御が難しい。SSML 非対応。
新構成:Google Cloud TTS + pychromecast(Python)
30 種類以上の高品質な声を選択可能。Python 完結でメンテナンスが容易。優先度付きキューで発話の順序と割り込みを制御。SSML・話速・ピッチ・音量補正に対応。
優先度付きキューによる割り込み制御
Python 標準の queue.PriorityQueue をデバイスごとに持ち、ワーカースレッドがキューからジョブを取り出して再生します。高優先度のジョブが来たときは再生中の音声を中断し、完了後に元のジョブを再開できます。
緊急通知が確実に届く
地震速報(優先度 10)が来れば、再生中の定時アナウンス(優先度 5)を中断して即座に割り込みます。日常の通知が重なっても順序が保証されます。
「ドゥルン」音問題とキープアライブ
Google Home は一定時間(数分〜十数分)音声を再生しないと接続がアイドル状態になります。この状態からいきなり音声を再生すると「ドゥルン」という起動音が先に鳴り、家族がビックリするという問題があります。
これを防ぐために、直近の発話から一定時間経過したら無音に近いダミー音声(0.1 秒程度の無音 MP3)を定期的に再生してアクティブ状態を維持しています。
起動音なしでスムーズな発話
キープアライブにより Google Home が常にアクティブ状態を保つため、突然の通知でも「ドゥルン」音なしにすぐ発話が始まります。
Google Cloud TTS の声一覧(日本語)
日本語で利用できる声は 4 グレードあり、上位グレードほど自然な発話になります。コードの TTSVoiceName クラスに用途コメントを付けてすべて定義しているので、シーンに合わせて選べます。
| グレード | 音声名の例 | 特徴 | 用途例 |
|---|---|---|---|
| Standard | ja-JP-Standard-A/B/C/D | 基本的な TTS 音声 | システム通知、案内 |
| Wavenet | ja-JP-Wavenet-A/B/C/D | より自然な音声 | ナレーション、説明 |
| Neural2 | ja-JP-Neural2-B/C/D | 滑らかで自然な音声 | 読み聞かせ、解説 |
| Chirp3-HD | ja-JP-Chirp3-HD-Aoede など | 最高品質、最も自然 | あらゆる用途、デフォルト推奨 |
事前準備
Google Cloud TTS API の有効化とサービスアカウントの作成
Google Cloud Console(console.cloud.google.com)で以下の手順を実施します。
- プロジェクトを作成(または既存プロジェクトを選択)
- 「Cloud Text-to-Speech API」を有効化
- 「IAM と管理」→「サービスアカウント」でサービスアカウントを作成
- 「Cloud Text-to-Speech 編集者」ロールを付与
- JSON 形式のキーをダウンロードしてホストマシンの任意のパスに配置
Google Cloud TTS は無料枠として月 100 万文字(Standard)または 100 万バイト(Wavenet/Neural2/Chirp3-HD)まで無料です。家庭内の通知程度であれば無料枠で十分まかなえます。ただしクレジットカードの登録は必要です。
必要なライブラリのインストール
pip install google-cloud-texttospeech
pip install pychromecast
pip install flask
pip install mutagen
pip install requests
Nginx の設定(TTS 音声ファイルの配信)
生成した TTS の MP3 ファイルを Google Home に配信するために Nginx で静的ファイルを公開します。ホストマシンの IP アドレスと Google Home が同じ LAN にある必要があります。
server {
    listen 80;

    # TTS 生成音声ファイルの配信
    location /temp_voice/ {
        alias /home/<username>/projects/smarthome/webserver/temp_voice/;
        autoindex off;
    }

    # その他の静的ファイル(効果音など)
    location /audio/ {
        alias /home/<username>/projects/smarthome/webserver/audio/;
        autoindex off;
    }
}
Google Home の IP アドレスの固定
ルーターの DHCP 設定で Google Home の MAC アドレスに固定 IP を割り当てておきます。IP が変わると pychromecast が探索失敗するリスクがあります。
実装方法
設定ファイル(settings.json)
{
    "google_app_credentials_path": "/home/<username>/projects/smarthome/config/keys/google-service-account.json",
    "nucbox_g3_plus_ip": "192.168.xx.xx",
    "googlehome": {
        "living": {
            "friendly_name": "リビングの Google Home",
            "ip": "192.168.xx.xx"
        },
        "child_room": {
            "friendly_name": "子供部屋の Google Home",
            "ip": "192.168.xx.xx"
        },
        "nesthub": {
            "friendly_name": "リビングの Nest Hub",
            "ip": "192.168.xx.xx"
        }
    },
    "nginx": {
        "url": {
            "google_temp_voice_url": "http://192.168.xx.xx/temp_voice",
            "audio_url": "http://192.168.xx.xx/audio"
        },
        "path": {
            "google_temp_voice_directry": "/home/<username>/projects/smarthome/webserver/temp_voice",
            "audio_directry": "/home/<username>/projects/smarthome/webserver/audio"
        }
    }
}
① クライアントライブラリ(googlehome.py)
他の Python プログラムから呼び出されるインターフェースです。speak() を呼ぶだけで内部 API サーバーへリクエストが送られ、Google Home から発話されます。
# -*- coding: utf-8 -*-
import requests
import random

# 内部 API サーバーの URL(ホストマシンの IP に合わせて変更)
GOOGLE_INTERNAL_API_URL = 'http://192.168.xx.xx/internal/googlehome'
AUDIO_DIR_URL = 'http://192.168.xx.xx/audio'

# Google Home デバイス一覧
class GoogleHome:
    LIVING     = '192.168.xx.xx'  # リビングの Google Home
    CHILD_ROOM = '192.168.xx.xx'  # 子供部屋の Google Home
    NEST_HUB   = '192.168.xx.xx'  # リビングの Nest Hub

# 利用可能な TTS 音声一覧(日本語)
class TTSVoiceName:
    # Standard(基本品質)
    STANDARD_A_F = 'ja-JP-Standard-A'   # 女性・落ち着いた声
    STANDARD_B_F = 'ja-JP-Standard-B'   # 女性・元気な声
    STANDARD_C_M = 'ja-JP-Standard-C'   # 男性・標準的
    STANDARD_D_M = 'ja-JP-Standard-D'   # 男性・低め

    # Wavenet(高品質)
    WAVENET_A_F = 'ja-JP-Wavenet-A'     # 女性・柔らかい声
    WAVENET_B_F = 'ja-JP-Wavenet-B'     # 女性・ハキハキ
    WAVENET_C_M = 'ja-JP-Wavenet-C'     # 男性・落ち着いた声
    WAVENET_D_M = 'ja-JP-Wavenet-D'     # 男性・深み

    # Neural2(より自然)
    NEURAL2_B_F = 'ja-JP-Neural2-B'     # 女性・滑らか
    NEURAL2_C_M = 'ja-JP-Neural2-C'     # 男性・やや低め
    NEURAL2_D_M = 'ja-JP-Neural2-D'     # 男性・落ち着いた

    # Chirp3-HD(最高品質・30 種類以上)
    CHIRP3_HD_AOEDE_F        = 'ja-JP-Chirp3-HD-Aoede'        # 女性・柔らかく自然(デフォルト)
    CHIRP3_HD_ACHERNAR_F     = 'ja-JP-Chirp3-HD-Achernar'     # 女性・明るく元気
    CHIRP3_HD_ENCELADUS_M    = 'ja-JP-Chirp3-HD-Enceladus'    # 男性・力強い
    CHIRP3_HD_CHARON_M       = 'ja-JP-Chirp3-HD-Charon'       # 男性・落ち着いた低め
    # ... (他 20 種類以上)

def get_random_voice():
    """全音声の中からランダムに 1 つ返す"""
    voices = [v for k, v in TTSVoiceName.__dict__.items()
              if not k.startswith('__') and isinstance(v, str)]
    return random.choice(voices)

class Notify:
    def __init__(
        self,
        googlehome: str = GoogleHome.LIVING,
        priority: int = 5,
        voice_name: str = TTSVoiceName.CHIRP3_HD_AOEDE_F,
        *,
        use_ssml: bool = False,
        speaking_rate: float = 1.0,
        pitch: float = 0.0,
        volume_gain_db: float = 0.0,
    ):
        self.googlehome      = googlehome
        self._priority       = priority
        self._voice_name     = voice_name
        self._use_ssml       = use_ssml
        self._speaking_rate  = speaking_rate
        self._pitch          = pitch
        self._volume_gain_db = volume_gain_db

    # ---- 音量操作 ----
    def up_volume(self, step: float = 0.1):
        requests.post(f'{GOOGLE_INTERNAL_API_URL}/volume/up',
                      json={'googlehome_ip': self.googlehome, 'step': step})

    def down_volume(self, step: float = 0.1):
        requests.post(f'{GOOGLE_INTERNAL_API_URL}/volume/down',
                      json={'googlehome_ip': self.googlehome, 'step': step})

    @property
    def volume(self) -> float:
        res = requests.get(f'{GOOGLE_INTERNAL_API_URL}/status',
                           params={'googlehome_ip': self.googlehome})
        return res.json().get('volume')

    @volume.setter
    def volume(self, value: float):
        requests.post(f'{GOOGLE_INTERNAL_API_URL}/volume/set',
                      json={'googlehome_ip': self.googlehome, 'volume': value})

    # ---- 音声ファイル再生 ----
    def play_url(self, url: str):
        requests.post(f'{GOOGLE_INTERNAL_API_URL}/play',
                      json={'googlehome_ip': self.googlehome, 'url': url,
                            'priority': self._priority})

    def play_audio(self, filename: str):
        self.play_url(f'{AUDIO_DIR_URL}/{filename}')

    # ---- TTS 発話 ----
    def speak(
        self,
        message: str,
        priority: int = None,
        voice_name: str = None,
        *,
        use_ssml: bool = None,
        speaking_rate: float = None,
        pitch: float = None,
        volume_gain_db: float = None,
    ):
        data = {
            'googlehome_ip':  self.googlehome,
            'message':        message,
            'voice_name':     voice_name     or self._voice_name,
            'priority':       priority        or self._priority,
            'use_ssml':       use_ssml        if use_ssml        is not None else self._use_ssml,
            'speaking_rate':  speaking_rate   if speaking_rate   is not None else self._speaking_rate,
            'pitch':          pitch           if pitch           is not None else self._pitch,
            'volume_gain_db': volume_gain_db  if volume_gain_db  is not None else self._volume_gain_db,
        }
        requests.post(f'{GOOGLE_INTERNAL_API_URL}/say', json=data)
② 内部 API サーバー(Flask + pychromecast)
クライアントライブラリからの HTTP リクエストを受け取り、TTS 生成・優先度キュー管理・pychromecast 再生を担うサーバーです。Google Home 1 台につき 1 つのワーカースレッドとキューを持ちます。
# -*- coding: utf-8 -*-
import os, uuid, time, threading, queue
from itertools import count
from datetime import datetime
from flask import Blueprint, request, jsonify
from google.cloud import texttospeech
import pychromecast
import mutagen.mp3
import requests as req

internal_bp = Blueprint('internal', __name__)

# ---- 定数 ----
GOOGLE_APP_CREDENTIALS_PATH = '/home/<username>/projects/smarthome/config/keys/google-service-account.json'
GOOGLE_TEMP_VOICE_URL      = 'http://192.168.xx.xx/temp_voice'
GOOGLE_TEMP_VOICE_DIR_PATH = '/home/<username>/projects/smarthome/webserver/temp_voice'

# ---- グローバル ----
devices      = []       # デバイス管理リスト
_job_counter = count()  # 同一優先度内の FIFO を保証するジョブID

# ---- Chromecast 探索 ----
def _get_chromecasts(target_ip=None, max_devices=3):
    found = []
    for _ in range(20):
        chromecasts, _ = pychromecast.get_chromecasts(timeout=5)
        for cc in chromecasts:
            cc.wait()
            ip = cc.socket_client.host
            if target_ip and ip != target_ip:
                continue
            if any(d.socket_client.host == ip for d in found):
                continue
            found.append(cc)
            if target_ip or len(found) >= max_devices:
                return found
        time.sleep(0.5)
    return found

# ---- Google Cloud TTS で MP3 を生成 ----
def _generate_tts(message, voice_name, *,
                  use_ssml=False, speaking_rate=1.0, pitch=0.0, volume_gain_db=0.0):
    client = texttospeech.TextToSpeechClient.from_service_account_file(
        GOOGLE_APP_CREDENTIALS_PATH
    )
    if use_ssml:
        ssml = message if message.startswith('<speak>') else f'<speak>{message}</speak>'
        synthesis_input = texttospeech.SynthesisInput(ssml=ssml)
    else:
        synthesis_input = texttospeech.SynthesisInput(text=message)

    voice  = texttospeech.VoiceSelectionParams(language_code='ja-JP', name=voice_name)
    config = texttospeech.AudioConfig(
        audio_encoding=texttospeech.AudioEncoding.MP3,
        speaking_rate=speaking_rate,
        pitch=pitch,
        volume_gain_db=volume_gain_db,
    )
    response = client.synthesize_speech(input=synthesis_input, voice=voice, audio_config=config)

    filename = f'tts_{datetime.now():%Y%m%d_%H%M%S}_{uuid.uuid4().hex[:8]}.mp3'
    filepath = os.path.join(GOOGLE_TEMP_VOICE_DIR_PATH, filename)
    with open(filepath, 'wb') as f:
        f.write(response.audio_content)
    return filename

# ---- デバイスごとの再生ワーカー ----
def device_worker(device):
    while True:
        priority, job_id, job = device['queue'].get()
        priority = -priority  # 格納時に符号を反転しているため戻す

        device['current'] = job
        cc = device['cast']
        cc.wait()
        cc.play_media(job['url'], 'audio/mp3')
        cc.media_controller.block_until_active()

        # MP3 の再生時間を取得して「再生完了まで待つ」ループを回す
        local_path = os.path.join(GOOGLE_TEMP_VOICE_DIR_PATH,
                                  os.path.basename(job['url']))
        audio_sec  = mutagen.mp3.MP3(local_path).info.length
        start      = time.monotonic()
        interrupted = False

        while True:
            elapsed = time.monotonic() - start
            if elapsed >= audio_sec + 2:
                break

            # 高優先度ジョブが来たら割り込み
            if device['new_queue_priority'] and device['new_queue_priority'] > priority:
                device['queue'].put((-priority, job_id, job))  # 今のジョブを戻す
                device['new_queue_priority'] = None
                interrupted = True
                break

            time.sleep(0.5)

        if not interrupted:
            os.remove(local_path)   # 再生完了後に一時ファイルを削除
            device['current'] = None
            device['queue'].task_done()

# ---- Google Home の初期化 ----
for cc in _get_chromecasts():
    device = {
        'name': cc.name,
        'ip':   cc.socket_client.host,
        'cast': cc,
        'queue':             queue.PriorityQueue(),
        'lock':              threading.Lock(),
        'current':           None,
        'new_queue_priority': None,
    }
    devices.append(device)
    threading.Thread(target=device_worker, args=(device,), daemon=True).start()

# ---- /say エンドポイント(TTS 発話)----
@internal_bp.post('/googlehome/say')
def say():
    body         = request.get_json(force=True)
    message      = body.get('message')
    googlehome_ip = body.get('googlehome_ip')
    if not message:
        return jsonify({'error': 'message required'}), 400

    device = next((d for d in devices if d['ip'] == googlehome_ip), None)
    if not device:
        return jsonify({'error': 'device not found'}), 404

    priority      = body.get('priority', 1)
    voice_name    = body.get('voice_name', 'ja-JP-Chirp3-HD-Aoede')
    use_ssml      = body.get('use_ssml', False)
    speaking_rate = body.get('speaking_rate', 1.0)
    pitch         = body.get('pitch', 0.0)
    volume_gain_db = body.get('volume_gain_db', 0.0)

    filename = _generate_tts(message, voice_name,
                              use_ssml=use_ssml, speaking_rate=speaking_rate,
                              pitch=pitch, volume_gain_db=volume_gain_db)

    url    = f'{GOOGLE_TEMP_VOICE_URL}/{filename}'
    job    = {'type': 'say', 'url': url, 'priority': priority}
    job_id = next(_job_counter)
    device['queue'].put((-priority, job_id, job))
    device['new_queue_priority'] = priority
    return jsonify({'status': 'queued'})

# ---- /play エンドポイント(音声ファイル再生)----
@internal_bp.post('/googlehome/play')
def play():
    body          = request.get_json(force=True)
    original_url  = body.get('url')
    googlehome_ip = body.get('googlehome_ip')
    if not original_url:
        return jsonify({'error': 'url required'}), 400

    device = next((d for d in devices if d['ip'] == googlehome_ip), None)
    if not device:
        return jsonify({'error': 'device not found'}), 404

    # URL から音声ファイルをダウンロードして一時フォルダに保存
    basename = os.path.basename(original_url)
    name, ext = os.path.splitext(basename)
    filename  = f'{name}_{uuid.uuid4().hex[:8]}{ext}'
    save_path = os.path.join(GOOGLE_TEMP_VOICE_DIR_PATH, filename)
    r = req.get(original_url)
    if r.status_code == 200:
        with open(save_path, 'wb') as f:
            f.write(r.content)

    url      = f'{GOOGLE_TEMP_VOICE_URL}/{filename}'
    priority = body.get('priority', 1)
    job      = {'type': 'play', 'url': url, 'priority': priority}
    job_id   = next(_job_counter)
    device['queue'].put((-priority, job_id, job))
    device['new_queue_priority'] = priority
    return jsonify({'status': 'queued'})

# ---- /status エンドポイント(デバイス状態取得)----
@internal_bp.get('/googlehome/status')
def googlehome_status():
    googlehome_ip = request.args.get('googlehome_ip')
    device = next((d for d in devices if d['ip'] == googlehome_ip), None)
    if not device:
        return jsonify({'error': 'device not found'}), 404
    cc = device['cast']
    cc.wait()
    return jsonify({
        'name':         device['name'],
        'ip':           device['ip'],
        'volume':       cc.status.volume_level,
        'muted':        cc.status.volume_muted,
        'is_idle':      cc.is_idle,
        'player_state': cc.media_controller.status.player_state,
    })
③ キープアライブ(googlehome_keepalive.py)
Google Home が長時間無音だと接続がアイドルになり、次の発話時に「ドゥルン」という起動音が鳴ります。これを防ぐために、最後の発話から一定時間経過したら無音に近いダミー MP3 を定期再生してアクティブ状態を維持します。
# -*- coding: utf-8 -*-
import time, datetime
import googlehome

# 優先度 0(最低)でダミー音声を再生
google_notify_living    = googlehome.Notify(googlehome.GoogleHome.LIVING,     priority=0)
google_notify_childroom = googlehome.Notify(googlehome.GoogleHome.CHILD_ROOM, priority=0)
google_notify_nesthub   = googlehome.Notify(googlehome.GoogleHome.NEST_HUB,   priority=0)

# 最後の発話ログファイル更新からの経過秒数を確認して
# 60 秒以上発話していない場合はダミー音声を再生する

while True:
    now = datetime.datetime.now()

    # 0 分を除く 3 分の倍数 かつ 28 秒のタイミングで実行
    if now.minute != 0 and (now.minute % 3 == 0 or now.minute in (59, 2)) and now.second == 28:

        # 直近 60 秒以内に通知していなければダミー音声を再生
        if log_living.get_seconds_since_the_file_was_updated() > 60:
            google_notify_living.play_audio('dummy.mp3')

        if log_childroom.get_seconds_since_the_file_was_updated() > 60:
            google_notify_childroom.play_audio('dummy.mp3')

        if log_nesthub.get_seconds_since_the_file_was_updated() > 60:
            google_notify_nesthub.play_audio('dummy.mp3')

    time.sleep(0.9)
dummy.mp3 は 0.1 秒ほどの無音 MP3 ファイルです。Audacity や ffmpeg で簡単に作れます。ffmpeg -f lavfi -i anullsrc=r=44100:cl=mono -t 0.1 -q:a 9 -acodec libmp3lame dummy.mp3 で生成できます。
④ systemd サービスファイル(内部 API サーバー)
[Unit]
Description=Smarthome Internal HTTP Server
After=network.target

[Service]
Type=simple
User=<username>
WorkingDirectory=/home/<username>/projects/smarthome
ExecStart=/usr/bin/python3 /home/<username>/projects/smarthome/interfaces/inbound/http_server.py
Restart=always
RestartSec=5

[Install]
WantedBy=multi-user.target
sudo systemctl daemon-reload
sudo systemctl enable smh-http-server.service
sudo systemctl start smh-http-server.service
sudo systemctl status smh-http-server.serviceコードの解説
1. 優先度付きキューの仕組み
queue.PriorityQueue は値が小さいほど優先度が高くなります。ジョブを積む際に優先度の符号を反転(-priority)することで、数値が大きいほど優先度が高い直感的な設計にしています。
# 優先度 10 の緊急通知(地震警報など)を積む
device['queue'].put((-10, job_id, job))   # -10 → PriorityQueue 内で最小 = 最優先
device['new_queue_priority'] = 10         # ワーカーへの割り込みシグナル

# 優先度 5 の通常通知
device['queue'].put((-5, job_id, job))

# ワーカー側:new_queue_priority が現在再生中の優先度より高ければ割り込み
if device['new_queue_priority'] and device['new_queue_priority'] > priority:
    device['queue'].put((-priority, job_id, device['current']))  # 現在ジョブを戻す
    interrupted = True
    break
2. SSML による自然な発話制御
use_ssml=True を指定すると SSML タグを使った細かな発話表現が可能になります。ポーズの挿入、強調、数字の読み方の指定などができます。
notify = googlehome.Notify(
    googlehome.GoogleHome.LIVING,
    use_ssml=True
)

# ポーズを挟みながら読み上げ
notify.speak(
    '<speak>'
    'おはようございます。'
    '<break time="500ms"/>'
    '今日の天気は'
    '<emphasis level="strong">晴れ</emphasis>'
    'です。<break time="300ms"/>'
    '最高気温は<say-as interpret-as="cardinal">25</say-as>度の予報です。'
    '</speak>'
)
3. 話速・ピッチ・音量補正のパラメータ活用例
子供部屋の Google Home を朝に使う際は声を少し高く・元気な口調に、緊急通知では少し速めに読み上げるといった使い分けができます。
# 子供部屋用:明るく元気な声で少し大きめに
google_notify_childroom = googlehome.Notify(
    googlehome.GoogleHome.CHILD_ROOM,
    voice_name=googlehome.TTSVoiceName.CHIRP3_HD_ACHERNAR_F,  # 明るく元気な女性声
    speaking_rate=1.1,      # 少し速め
    pitch=2.0,              # 少し高め
    volume_gain_db=16.0,    # 音量を上げる(子供部屋は聞こえにくいため)
)
google_notify_childroom.speak('起きてください!もう朝ですよ!')

# 緊急通知用:落ち着いた男性声で明瞭に
google_notify_urgent = googlehome.Notify(
    googlehome.GoogleHome.LIVING,
    priority=10,             # 最高優先度
    voice_name=googlehome.TTSVoiceName.CHIRP3_HD_ENCELADUS_M,  # 力強い男性声
    speaking_rate=0.9,       # 少しゆっくり(聞き取りやすく)
)
4. ランダム音声で飽きさせない
毎回同じ声だと単調になるため、毎回ランダムな声で発話させる機能も実装しています。定時アナウンスなどに使うと毎回違う声で発話されます。
import googlehome

notify = googlehome.Notify(googlehome.GoogleHome.LIVING)
# 呼ぶたびにランダムな声で発話する
notify.speak(
    '今日のお昼ごはんは何にしますか?',
    voice_name=googlehome.get_random_voice()
)
動作確認
まず内部 API サーバーを起動してから、テスト用スクリプトで動作を確認します。
# 内部 API サーバーを起動(別ターミナルで)
python3 /home/<username>/projects/smarthome/interfaces/inbound/http_server.py
import time
import googlehome
# 基本テスト:リビングで発話
notify = googlehome.Notify(googlehome.GoogleHome.LIVING)
notify.speak('こんにちは。スマートホームシステムが正常に動作しています。')
time.sleep(5)
# 優先度テスト:低優先ジョブを積んでから高優先ジョブで割り込み
notify_low = googlehome.Notify(googlehome.GoogleHome.LIVING, priority=1)
notify_high = googlehome.Notify(googlehome.GoogleHome.LIVING, priority=10)
notify_low.speak('これは低優先度のメッセージです。長い文章なので少し時間がかかります。')
time.sleep(1)
notify_high.speak('高優先度の割り込みメッセージです!') # こちらが先に再生される
time.sleep(10)
# SSML テスト
notify_ssml = googlehome.Notify(googlehome.GoogleHome.LIVING, use_ssml=True)
notify_ssml.speak(
'<speak>SSML テストです。'
'<break time="1s"/>'
'1 秒のポーズを入れました。'
'</speak>'
)
print('テスト完了')動作確認のチェックポイント
①「こんにちは」が Google Home から再生される ②低優先度メッセージの途中で高優先度メッセージが割り込む ③SSML の 1 秒ポーズが発話の途中に入る — これら 3 点が確認できれば正常に動作しています。
まとめ
Google Cloud TTS と pychromecast を組み合わせることで、Google Home を本格的な「自家製 TTS 放送局」に仕立てる方法を紹介しました。
- Google Cloud TTS の 30 種類以上の日本語音声(Chirp3-HD が最高品質でおすすめ)
- 優先度付きキューと割り込み制御で緊急通知を確実に届ける
- SSML・話速・ピッチ・音量補正で状況に合わせた発話表現
- キープアライブで「ドゥルン」音を抑制しストレスフリーな運用
- Flask 内部 API サーバーにより他のプログラムから 1 行で呼び出せる統一インターフェース
このシステムを基盤として、鉄道遅延通知・定時アナウンス・地震速報・天気予報・帰宅通知など様々な通知機能を実装しています。Google Home を「ただのスマートスピーカー」ではなく「家族への情報発信ツール」として活用することで、ITを意識しない家族も恩恵を受けられるスマートホームが実現できます。